Wednesday, 23 October 2013

Life Drawing

I attended my first live drawing session and was very pleased with the outcome of the day. Over the summer I had gotten really interested in character design and figure drawing so I decided to do some research of the human body and anatomy through existing artwork and studying the human body through reading and drawing.
This really helped with my session as I already had basic knowledge of what to do and the calculations of the body proportions of a human. Though a male figure was far different compared to the females, something I hadn't thought of as much since I'd mostly drawn female figures.
The pathway choice I wish to pick is Lense Based Media and knowing the human figure is a very important part of it. Character design is a curtail part of animation- which is the field I wish to work in.


Lecture 4

Fashion Styling

The fourth lecture I went to was held by Katy Lassen, a freelance stylist. She had a large work experience list as she had worked with magazines, designers, musicians, photographers and celebrities.

Her range of work experience and struggles really had me intrigued into the whole fashion world; fashion being my initial area to work in, before I'd taken an Art and Design Foundation diploma. We were taught about how the work load of job titles could vary from company to company, for example; a fashion editor for Vogue would have a far different work style compared to a fashion editor of an independent magazine.

The downside of being freelance would be that it's possible to not have a job for a few weeks in a row. This would mean you'd have to go around and ask fi there's any jobs available for you. The only way you can get a decent job would depend on your work experience; however to get work experience in the fashion world, you need more work experience. Although that seems strange, that's how the competitive world of fashion works.

What really surprised me was that often Lassen had worked without any pay, simply to build up her list of work experience. This also helped her commercially and helped her get connections so she can get herself out there and known.

Life as a freelance fashion stylist seems full of struggles yet as a very interesting approach in life. Jobs like an intern who'd go around as give everyone coffee and help with photocopying don't matter when it's the experience and company name that's worth having on your CV.

Thursday, 10 October 2013

Faceless Faces; Review


During my visit to the Tate Modern, on the 9th of October, I'd viewed many artistic pieces; ranging from tiny paintings to ceiling high structures- all of which were amazing and inspirational in their own way. Upon entering the room labelled 'Transformed Vision' it was clear that there was a real lack on colour and the pallet was limited through out most artworks, or rather more dulled down. This gave it a sense of eeriness and arose question within me, which cased me to look around.

The one that struck out to me was the one in the picture above; Candelabra with Heads, a sculpture by Thomas Hirschhorn.

Found in the Transformed Vision room on Level 3. This piece particularly struck out to me because of the initial shock I had when coming across it. The strange figured rolled up in brown tape, with heads emerging out of them- or submerging into-, all stuck to a wooden frame; was definitely something to stop and ponder over.

"This is something essential to art: reception is never its goal. What counts for me is that my work provides material to reflect upon. Reflection is an activity."

Learning that this was part of an exhibition called Concretions, a term from geology and medicine which suggests the growth of a solid mass. This sculpture got me to reflect upon what it could possibly mean and how it could relate to the theme or the room. The juxtaposition between bodily and abstract art, and themes that followed the Second World War. I see it as the after image of the Second World War, in which the bodied of the dead were mostly rolled or covered in sacks and burned- hence the wood. I also see a connection between the birth and death of a person, a child being emerged from a covering only to be submerged into another after death.


Bibliography

'Critical Laboratory: The Writings of Thomas Hirschhorn (October Books) by Thomas Hirschhorn, Lisa Lee and Hal Foster (2 Aug 2013)'

'Material: Public Works - The Bridge 2001 (Warm Seas) by Thomas Hirschhorn and Craig Martin (1 Aug 2001)'

'Thomas Hirschhorn (Contemporary Artists) by Alison Gingeras, Benjamin H. D. Buchloh and Carlos Basualdo (Sep 2004)'

'Thomas Hirschhorn: Establishing a Critical Corpus by Claire Bishop, Sebastian Egenhofer, Hal Foster and Thomas Bizzarri (1 Jun 2011)'

'Thomas Hirschhorn - it's Burning Everywhere by Ulrike Lorenz (1 Mar 2011)'

'Thomas Hirschhorn: Kurt Schwitters-Plattform by Carina Plath and Annerose Rist (9 Dec 2011)'


'"ART IN REVIEW; Thomas Hirschhorn -- 'Cavemanman'". New York Times by Kimmelman, Michael (2002-11-15).'

'Bringing Art and Change to Bronx. New York Times by Randy Kennedy (June 27, 2013)'

Tate Modern


To write a review was our task for the end of the week, and to be able to do so, I visited the Tate Modern. Thoroughly going through the exhibitions available to me, so I could choose one that struck me the most to write a review about.

Exhibitions:
  • Poetry and Dream - Russian Revolutionary Posters, Element of Chance
  • Structure and Clarity - Minimalism, Ellsworth Kelly
  • Energy and Process - Arte Povera and Anti- Form Room, Homeworks including Annette Messager, Tracy Emin and Rosmary Trocket, William Egglestone
  • Transformed Vision - New Images of Man, Gerhard Richter


Fashion & Textiles: Paper Garment

Day 3:

Throughout the week we'd been prepared for our final day of fashion, which was going to be used for garment making. Knowing I wanted to make a dress, I had prepared a few ideas on what to make. I didn't want the trouble of taking a long time in trying to pick a design therefore three seemed like a good number, not too little nor too less, and went on to sketched and finalised the designs.

The material we would be using was paper so the designs couldn't be well draped nor too complex to make. On the other hand, I didn't want to make something simple and boring either, so I'd really though about the construction of my designs in thorough detail to make sure it was possible to make out of paper.

I decided that the third design would be the one I was going to make, as it was easiest to construct with paper, while being equally as exciting to look at.


On to the making.
Starting the pattern cutting was the hardest part because no templates were available and it was all freehand, we also had to be calculate the measurements on a mannequin or a partner- who would also be busy with their own making.

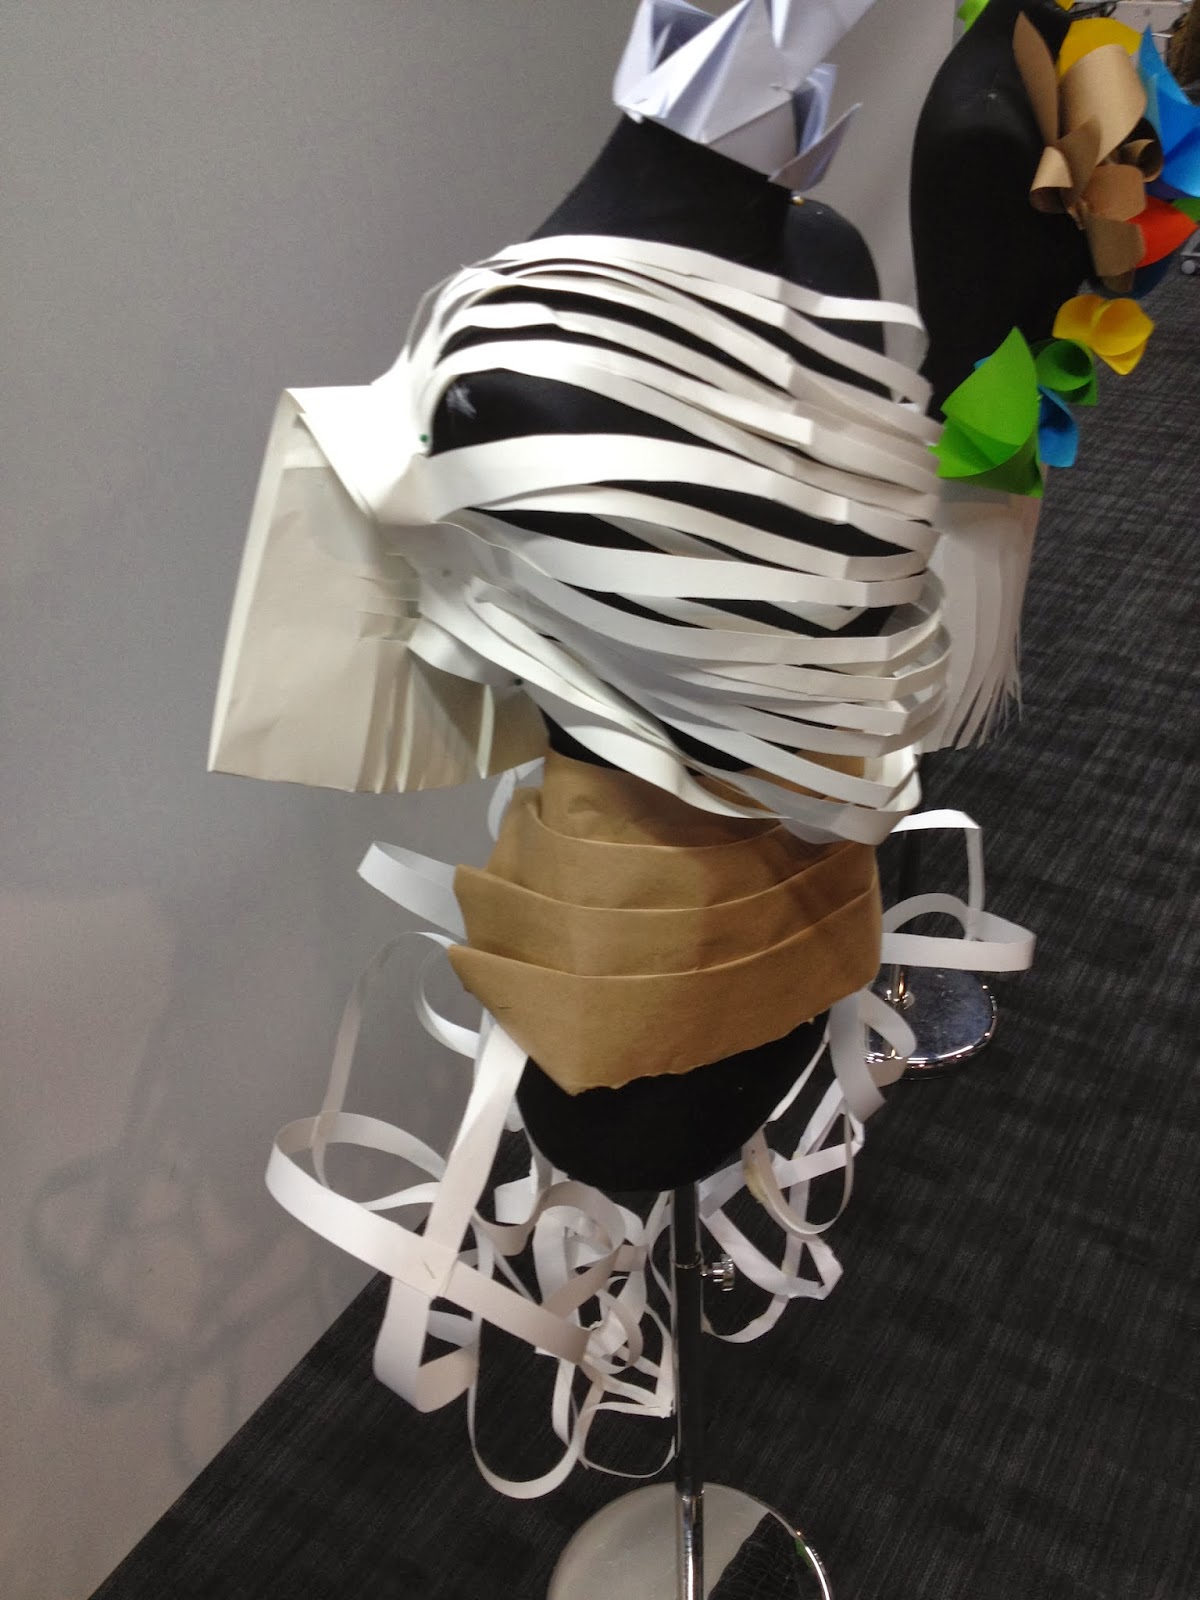
After the torso had been measured and constructed, the skirt wasn't all too difficult. It turned out fine and fairly easy. However, since the material was paper, it didn't have the qualities a dress like this would require, it was too flat and stiff.
My way of working with the obstacle was to alter the design to slightly, so it could balance with the stiffness of the paper. Instead of weaving string to connect the skirt panels, I used tissue paper in between them as ruffles. This added the volume I wanted in the dress which worked just as well as the design had intended it to.


I was very pleased with the outcome of the dress as paper isn't a very easy material to make a garment out of and tape and stapler pins are the most strongest of fastenings. The garment was wearable, strong and didn't come off the body, therefore I think I achieved a good final product.

Fashion & Textiles: Playing with paper

Day 2:

On the previous lesson we were told to bring photographs of models from magazines for our work today, we were to be selective of the different poses and it had to be of at least and A4 size. Our task was to create garments for them by using paper- through the techniques we'd used yesterday- and sticking it on top of the cut outs.
I had an idea of how to work with the task as I have previously partaken in such things. Therefore, getting the hang of it didn't take too long.

I created the first one using two different coloured papers, scrunched them up randomly and stuck them on the model. The one with her back facing the camera, I choose that image because it was a different pose and she was wearing little enough for me to cover easily.

For the second one, I cut out a rectangular piece of paper and drew many small polka dots on it. I then gathered up the top and stuck it on the model as a skirt. To add some more colour and layers to the skirt, I curled long and thin pieces of paper and stuck them down at the top edge of the skirt.

Lastly I made a dress out of two different parts because the pattern on the paper was already very exciting and had fold like effects; which made it perfect for a dress.

___________
 
For the next part of the lesson we were to trace out a part of the body and design something over it.
 
I drew out a base for five pairs of feet and drew out designs of shoes. This was because I've recently really become fond of shoe design, so to try out some skills and techniques I though this would be a fun and useful task.
 
The next body part I designed for was the hand/wrist/arm area. Being someone who wears a lot of bracelets and gloves I have knowledge of what kind of accessories are worn and what would be different.
___________
 
Our final task for the day took us back to our paper garment models. We had to choose two of the best ones and make large photocopies out of them. I then drew shapes of clothing on some tracing paper and moved it along the photocopy. This way I could see where the garment outline looked best. Then I cut out the shape and stuck it down on the paper.
The process was repeated over all 10 times, because we had to make 5 outfits through 5 tops and 5 bottoms.


Lecture 3

Fluid Pictures

The third lecture was held by Dave Throssell; he is the CEO, creative director and managing director of Fluid pictures. A company that has worked with animation, commercials and visual affects.

We were shown a project they'd worked on called The Zeppelin Project. It was originally an idea founded from a small spark and was later worked on to create an opening for a TV show. Through insight of the process of making was given to us in a very ordered, step by step process. Every stage was covered in the lecture, from brainstorming to final results.
All this was aided with visual images and videos to give us a proper sense of work being done and the completion of it.

There are many processes that go into the making before a final outcome is produced; processes such as: storyboards, still shots, scripts, CG models and techniques, tests and more. All these steps have to be thoroughly gone through before a final product is made to it's best standard, which was something new to me, as I wouldn't have initially though all this research would even be considered, let alone needed.

Fashion & Textiles: Shapes and Structures

Day 1:

Fashion and Textiles began with us being informed of was that we'd we making a fashion garment at the end of this week using paper.

The first thing we were to do was to familiarising ourselves with the material we'll be using for the week; paper. In terms of textiles, paper is used in a different way than we've been previous using during the rotations. Though it's similar in terms of treating it, i.e; folding, cutting, scrunching, it's purpose is for something that could be worn as a whole or as part of something.

I experimented with different paper types such as newspaper and tissue paper. Using them I created different effects and 3D shapes using various techniques. I tried out different methods of manipulating the paper to achieve shapes that as our task had been set.


___________

After creating the little samples, I selected one to make on a larger scale. The coat seemed like the best option since it was already a garment piece.


___________
 
The following task was a group activity which involved 3 person per group, standing beside a mannequin- which wasn't our own - and followed instructions from Andrea. We were given a few minutes to create a garment, based on the theme given to us, as we rotated around in a circle.
 
  • Free to create anything, without instructions:
    Peacock/hula-girl or a peacock/ballerina, both with a sash seemed like a cute and interesting idea as it was a starter.

 
  • Futuristic:
    A questionable and metallic looking garment is what I'd call futuristic. Something with an interesting collar or shape.
 
  •  Symmetrical:
    Symmetry can be measured from every angle, so we decided to play with angels in terms of showing mystery.

 
  • Focusing on shoulders:
    Conveniently, two huge cone shapes happen to be there and we took the opportunity to create some costume/evil queen looking shoulder pieces, contrasted with a more gentle look, curled front.

  • Focusing on bottom half:
    I like the idea of shapes and angles, so we used that in this skirt.
  • Environmental:
    Being the most different and least successful one, visually. Though we did like that the way the paper was treated to create a very earthy effect, the drapes acting as grass and the flower on the other shoulder, all connecting to nature.
 

Lastly, we returned back to our own mannequin and were to make something out of what we had originally made, for a little photography session.